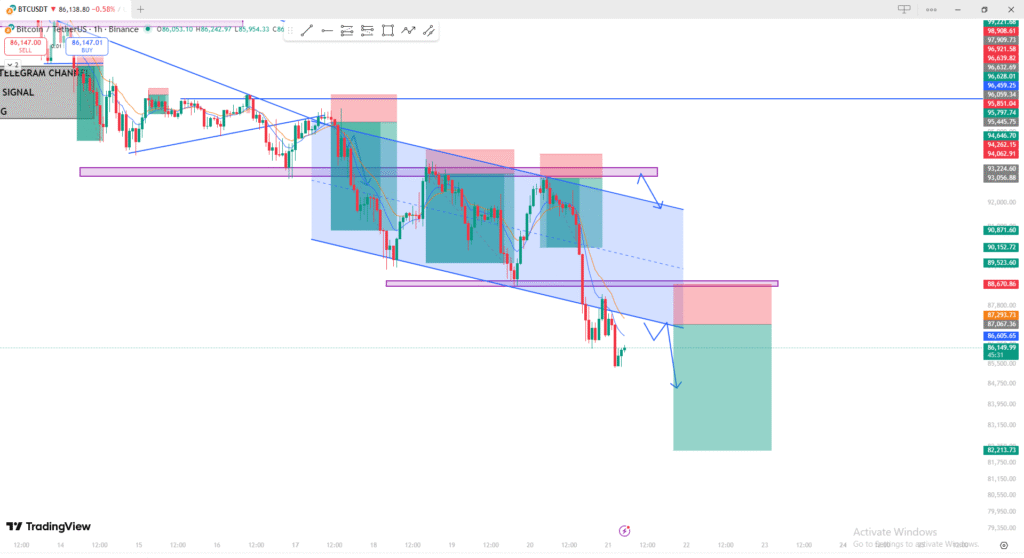
✅ BTC/USDT Chart Analysis (1H Timeframe)
1. Overall Trend → Bearish
The chart clearly shows a descending channel, meaning:
- Price is forming lower highs and lower lows
- Every time price reaches the upper channel trendline, it gets rejected
- Momentum is consistently bearish
This confirms a strong downtrend structure.
2. Key Levels (Purple Zones)
The purple horizontal zones represent important support/resistance flips:
- Previous support → now acting as resistance
- Every pullback into these zones shows strong selling pressure
- The latest retest also failed, sending price downward again
These zones are ideal for sell setups.
3. Sell Setup Shown in Chart
Your chart displays a classic trend-continuation sell:
Entry Logic
- Small pullback into purple resistance zone
- Confluence with descending channel upper boundary
- Price also reacting to EMA (bearish slope)
👉 Entry = Sell on retest of resistance
Stop Loss
- Placed slightly above the resistance zone (red box)
Take Profit
- Channel lower trendline
- Extended target into the deeper liquidity zone (large green box)
This is a clean R:R setup.
4. Market Psychology
This pattern reflects:
- Weak buyers → smaller pullbacks
- Strong sellers → strong downward impulses
- EMA is sloping downward → momentum remains bearish
Everything aligns with continuation to the downside.
5. Expected Move (Based on Your Drawing)
According to the arrows in your chart:
- A small bullish pullback
- Rejection at resistance
- A sharper drop toward the 82k region (target zone)
This is a textbook trend continuation pattern.
📉 Summary
| Factor | Reading |
|---|---|
| Trend | Bearish |
| Structure | Descending Channel |
| Pullback | Weak |
| Momentum | Bearish |
| Best Setup | Sell pullbacks |
| Target | Lower channel / 82k zone |
